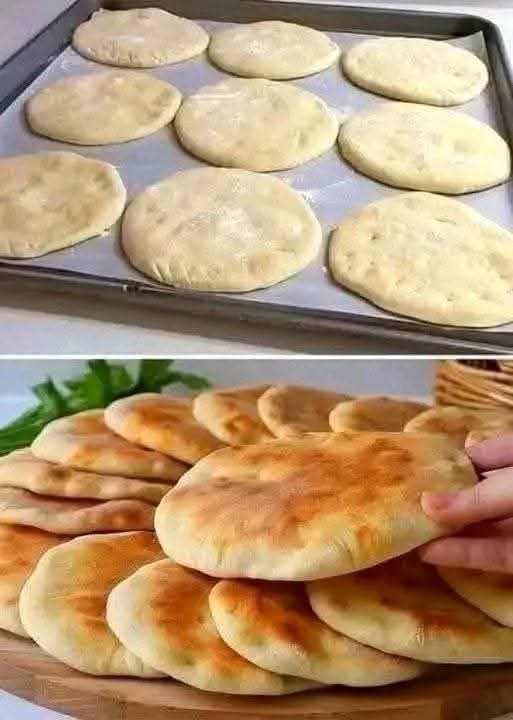
🍞 Easy No-Knead Homemade Bread
No Eggs • No Butter • No Mixer • No Complicated Kneading
🌾 Introduction
There is something wonderfully comforting about a loaf of freshly baked bread. The golden crust, the soft interior, and the warm aroma filling the kitchen can make even a simple meal feel special.
This easy homemade bread is designed for anyone who wants delicious bread without expensive ingredients or complicated techniques. There are no eggs, no butter, and no kneading required. You simply mix the ingredients, allow the dough to rise, shape it gently, and bake.
The result is a beautifully rustic loaf with a crisp golden crust and a soft, airy center. It is wonderful for breakfast, sandwiches, soups, stews, or simply tearing off a warm piece and enjoying it with olive oil.
🧺 Ingredients
For 1 large loaf
- 500 g (about 4 cups) all-purpose flour
- 7 g (2¼ teaspoons) instant or active dry yeast
- 1½ teaspoons salt
- 1 teaspoon sugar
- 375–400 ml (1½–1⅔ cups) warm water
- 1 tablespoon olive oil, optional
- A little extra flour for shaping
Optional toppings
- Sesame seeds
- Nigella seeds
- Sunflower seeds
- Pumpkin seeds
- Oats
- A sprinkle of flour for a rustic finish
🥣 Instructions
1. Activate the yeast
If using active dry yeast, place the warm water in a large bowl.
Add the sugar and yeast and stir gently.
Let the mixture stand for approximately 5–10 minutes, until it becomes slightly foamy.
If using instant yeast, you can mix it directly with the flour instead.
Important: The water should feel warm, not hot. Very hot water can damage the yeast.
2. Make the dough
Add the flour and salt to the bowl.
Pour in the yeast mixture and add the olive oil if using.
Using a wooden spoon, spatula, or your hands, mix everything together until there are no large patches of dry flour.
The dough should be soft, sticky, and slightly shaggy.
Do not worry about making it smooth.
The secret:
Don’t knead it!
The long resting time will allow the gluten to develop naturally.
⏳ 3. First Rise
Cover the bowl with plastic wrap, a clean kitchen towel, or a plate.
Leave the dough somewhere warm for approximately 1½–2 hours, or until it has doubled in size.
If your kitchen is cool, it may take a little longer.
The dough should look puffy and full of air bubbles.
🥖 4. Shape the Bread
Lightly flour your work surface.
Gently scrape the dough from the bowl onto the floured surface.
Avoid aggressively pressing all the air out.
Fold the dough toward the center several times until it forms a rough round or oval loaf.
You don’t need perfect shaping.
Place the dough on a piece of parchment paper or a lightly floured baking tray.
Cover it loosely and allow it to rest for another 20–30 minutes.
🔪 5. Prepare the Loaf
Preheat your oven to 220°C (425°F).
Using a sharp knife or bread lame, make one or two shallow cuts across the top of the loaf.
These cuts allow steam to escape and give the bread an attractive rustic appearance.
If desired, lightly brush the surface with water and sprinkle it with sesame seeds, oats, or other toppings.
🔥 6. Bake
Place the loaf into the hot oven.
For a crispier crust, place a small oven-safe pan of hot water on the lower rack during the first part of baking.
Bake for approximately:
30–40 minutes
The bread should become deeply golden brown and sound hollow when tapped underneath.
If the top browns too quickly, loosely cover it with aluminum foil during the final part of baking.
🌬️ 7. Cool Before Cutting
This is one of the hardest parts!
Remove the bread from the oven and place it on a wire rack.
Allow it to cool for at least 30–60 minutes before slicing.
Cutting bread while it is extremely hot can make the inside gummy.
Once cooled, slice it and enjoy!
👩🍳 The Method Behind This Easy Bread
The beauty of this recipe is that time does the work instead of your hands.
Traditional bread recipes often require substantial kneading to develop gluten. With this method, the dough contains enough water and is given plenty of resting time. During fermentation, the yeast produces carbon dioxide, which becomes trapped in the developing gluten network.
That creates the light, airy texture inside the finished loaf.
The basic process is:
Mix → Rest → Rise → Shape → Rest → Bake → Cool
That’s it!
🕰️ A Little History of Homemade Bread
Bread is one of the oldest prepared foods in human history.
Long before modern bakeries, people discovered that mixtures of grains and water could be transformed into nourishing flatbreads. Over generations, fermentation became an important part of breadmaking.
Yeast fermentation allowed bread to become lighter and more flavorful. Different cultures developed their own techniques, shapes, grains, and baking traditions.
The modern no-knead approach is a wonderful example of how simple ingredients and patience can produce excellent bread without sophisticated equipment.
🏡 Formation and Texture
During the first rise, the dough expands as yeast produces carbon dioxide.
When you gently shape the dough, you organize the structure without destroying all those precious air pockets.
During baking, several things happen:
🔥 The outside becomes golden and crisp.
💨 Steam expands inside the dough.
🫧 The trapped gases help create air pockets.
🌾 The starches and proteins set as the bread cooks.
✨ The crust develops its delicious roasted flavor.
The final result is a loaf with a crunchy exterior and soft, chewy interior.
💡 Tips for Perfect Bread
1. Don’t add too much flour
A sticky dough is completely normal.
Adding lots of extra flour can make the bread heavy and dry.
2. Use warm—not hot—water
Water that is too hot can interfere with the yeast.
3. Give the dough enough time
If your kitchen is cold, the dough may need additional rising time.
Look at the dough rather than relying only on the clock.
4. Preheat properly
A thoroughly heated oven helps the loaf rise beautifully when it first enters the oven.
5. Don’t slice immediately
Give the bread time to finish setting internally.
🧄 Delicious Ways to Enjoy It
This bread is incredibly versatile.
Serve it with:
- 🫒 Olive oil and herbs
- 🧀 Cheese
- 🍅 Tomatoes and olive oil
- 🥚 Breakfast dishes
- 🍲 Soups
- 🥘 Stews
- 🥗 Salads
- 🥪 Sandwich fillings
- 🧈 Butter or spreads, if desired
- 🍯 Honey or jam
For a Moroccan-inspired serving idea, try warm slices with olive oil, olives, tomatoes, and a cup of mint tea.
❤️ Who Will Love This Recipe?
This recipe is especially great for:
- Busy families
- Beginner bakers
- Students
- Anyone trying to save money
- People without a stand mixer
- Anyone who doesn’t enjoy kneading dough
- Homemade-bread lovers
- Anyone looking for a simple everyday loaf
It’s also a wonderful recipe to teach children because the ingredients are simple and the process is easy to understand.
🔄 Storage
Once completely cool, store the bread in a bread bag, paper bag, or clean kitchen towel.
For best texture, enjoy it within 1–2 days.
You can also slice the loaf and freeze the slices in an airtight freezer bag.
Simply take out individual slices whenever you need them and warm them in a toaster or oven.
🌟 Easy Variations
🌾 Whole-Wheat Version
Replace up to half of the all-purpose flour with whole-wheat flour. You may need a little additional water.
🌿 Herb Bread
Add dried oregano, rosemary, thyme, or Italian herbs to the dough.
🧄 Garlic Bread
Mix roasted or finely minced garlic and herbs into the dough.
🌻 Seeded Bread
Add sunflower seeds, pumpkin seeds, sesame seeds, or flaxseed.
🫒 Olive Bread
Add chopped olives and a little dried oregano for a Mediterranean-style loaf.
🧅 Onion Bread
Add finely chopped sautéed onion after the dough has been mixed.
💰 Why This Bread Is So Affordable
The basic recipe requires only a handful of inexpensive ingredients:
Flour + yeast + salt + water + a little sugar
There are no eggs, butter, expensive dairy products, or specialized baking ingredients.
And because you make it yourself, you can produce a generous loaf for a fraction of the cost of many specialty bakery breads.
🍞 Final Conclusion
This no-knead bread proves that homemade baking doesn’t have to be complicated.
You don’t need a mixer.
You don’t need eggs.
You don’t need butter.
And you don’t need to spend a long time kneading dough.
What you do need is simple ingredients, a little patience, and a hot oven.
Once you pull that golden loaf from the oven and hear the crust crackle as it cools, you’ll understand why homemade bread is so satisfying.
❤️ For the Bread Lovers
If you love the smell of freshly baked bread, the crispness of a golden crust, and the softness of a warm homemade loaf, this recipe is definitely worth saving.
Mix it. Let it rise. Shape it. Bake it. Enjoy it.
Sometimes the simplest recipes become the ones we make again and again. 🍞❤️
📌 Quick Recipe Summary
Prep: 10 minutes
First rise: 1½–2 hours
Second rest: 20–30 minutes
Bake: 30–40 minutes
Oven: 220°C / 425°F
Yield: 1 large loaf
No kneading. No eggs. No butter. Just simple homemade bread. ❤️🍞