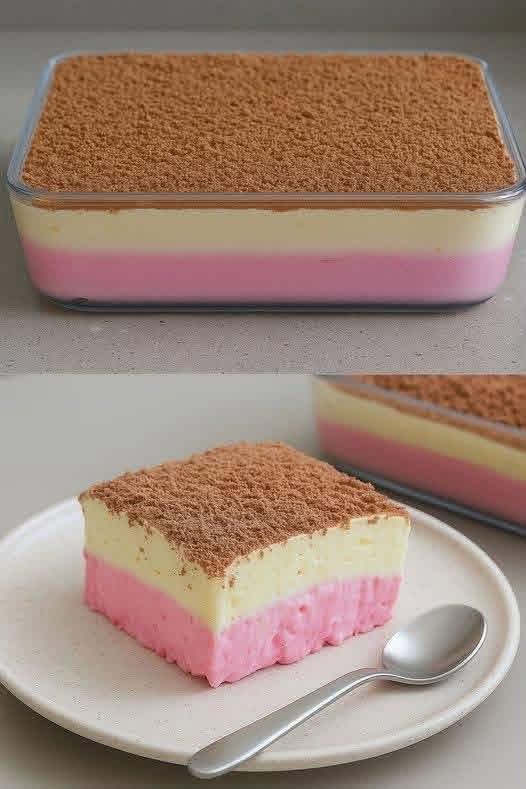
🍓🍍 Strawberry Pineapple Layered Dessert
No-Bake, Quick, Creamy & Refreshing
🌸 Introduction
If you love easy desserts that look beautiful without spending hours in the kitchen, this Strawberry & Pineapple Layered Dessert is perfect. It combines juicy strawberries, sweet pineapple, fluffy cream, and a buttery biscuit layer into a colorful dessert that is creamy, fruity, and wonderfully refreshing.
The best part? There is no oven required! Everything comes together with simple ingredients and a little chilling time. The beautiful layers make it perfect for family gatherings, birthdays, holidays, summer celebrations, or simply when you want something sweet after dinner.
It is also an excellent dessert for fruit lovers because every spoonful gives you a combination of creamy, crunchy, sweet, and fruity textures.
🛒 Ingredients
🍪 For the Biscuit Layer
- 250 g digestive biscuits or graham crackers
- 80 g melted butter
- 1 tablespoon sugar, optional
- 1 pinch of salt
🍓 For the Strawberry Layer
- 400 g fresh strawberries
- 2 tablespoons sugar
- 1 tablespoon lemon juice
- 1 teaspoon cornstarch
- 2 tablespoons water
🍍 For the Pineapple Layer
- 400 g crushed pineapple, well drained
- 2 tablespoons sugar
- 1 teaspoon cornstarch
- 2 tablespoons water
🥛 For the Creamy Filling
- 400 ml cold heavy whipping cream
- 250 g cream cheese, softened
- 100 g powdered sugar
- 1 teaspoon vanilla extract
- 150 g sweetened condensed milk
- 2 tablespoons lemon juice
✨ For Decoration
- Fresh strawberries
- Small pineapple pieces
- Crushed biscuits
- Whipped cream
- Mint leaves, optional
- White chocolate shavings, optional
👩🍳 Instructions
Step 1: Prepare the Biscuit Base
Place the biscuits in a food processor and crush them into fine crumbs.
If you don’t have a food processor, place the biscuits inside a sealed bag and crush them with a rolling pin.
Transfer the crumbs to a bowl.
Add the melted butter, sugar if using, and a small pinch of salt.
Mix until the crumbs resemble wet sand.
Set aside.
Step 2: Prepare the Strawberry Mixture
Wash the strawberries and remove the green tops.
Cut them into small pieces.
Place about half of the strawberries in a saucepan with the sugar and lemon juice.
Mix the cornstarch with 2 tablespoons of water in a small bowl until smooth.
Add it to the strawberries.
Cook over medium-low heat for approximately 3–5 minutes, stirring gently.
The strawberries should soften slightly and the mixture should become lightly thickened.
Remove from the heat.
Stir in the remaining fresh strawberry pieces.
Allow the mixture to cool completely.
🍍 Step 3: Prepare the Pineapple Layer
Drain the crushed pineapple very well.
Excess liquid can make the dessert watery, so this step is important.
Place the pineapple, sugar, and cornstarch mixture into a saucepan.
Cook over medium-low heat for about 3–5 minutes, stirring frequently.
Once slightly thickened, remove from the heat and let it cool completely.
🥛 Step 4: Make the Creamy Filling
Place the softened cream cheese in a large mixing bowl.
Beat until smooth and creamy.
Add the powdered sugar and vanilla extract.
Beat again until well combined.
Add the condensed milk and lemon juice.
Mix until smooth.
In another bowl, whip the cold heavy cream until it forms medium-stiff peaks.
Gently fold the whipped cream into the cream-cheese mixture.
Do not overmix. You want to keep the filling light and fluffy.
🍓🍍 Step 5: Form the Layers
Now comes the fun part!
You can use one large glass serving dish or individual dessert cups.
For individual cups, create the layers in this order:
Layer 1
Add a layer of crushed buttery biscuits.
Press it down gently.
Layer 2
Add a generous layer of creamy filling.
Smooth the surface with the back of a spoon.
Layer 3
Add the strawberry mixture.
Spread it evenly.
Layer 4
Add another layer of cream.
Layer 5
Add the pineapple mixture.
Layer 6
Finish with another layer of cream.
Smooth the top beautifully.
✨ Step 6: Decorate
Decorate each dessert with:
- A fresh strawberry
- A small piece of pineapple
- A swirl of whipped cream
- A sprinkle of biscuit crumbs
- White chocolate shavings, if desired
- A tiny mint leaf for a fresh finish
For a beautiful presentation, place strawberry slices against the inside of the glass before adding the filling. This creates a gorgeous strawberry pattern that can be seen through the dessert.
❄️ Step 7: Chill
Cover the dessert and refrigerate for at least 4 hours.
For the best texture, refrigerate overnight.
The chilling time allows the biscuit layer to soften slightly, the cream to become firm, and the fruit flavors to blend together.
🍴 Method Summary
Crush → Mix → Cook the fruit → Cool → Whip the cream → Combine → Layer → Decorate → Chill → Serve.
This simple method creates a dessert that looks complicated but is actually very easy to prepare.
📜 A Little History
Layered desserts have appeared in many forms around the world. The idea is simple: combine contrasting textures and flavors in visible layers so that every spoonful contains several components.
Modern no-bake desserts became especially popular because they are convenient and require little equipment. Cream, biscuits, fruit, pudding, and condensed milk are frequently combined to create chilled desserts that can be prepared ahead of time.
Strawberries and pineapple are particularly popular in these desserts because strawberries contribute a bright, slightly tangy flavor, while pineapple provides tropical sweetness and acidity.
This recipe brings those ideas together into one colorful dessert.
🧁 The Formation of the Dessert
The beauty of this recipe comes from the way each layer contributes something different.
🍪 Biscuit Layer
Provides buttery flavor and a pleasant soft-crunchy texture.
🥛 Cream Layer
Creates the smooth, rich, fluffy center.
🍓 Strawberry Layer
Adds fresh color, sweetness, and a little acidity.
🍍 Pineapple Layer
Adds tropical flavor and juicy fruitiness.
✨ Decoration
Makes the dessert visually appealing and gives you a little extra fresh fruit with every serving.
The combination creates a wonderful contrast between crunchy, creamy, fruity, sweet, and tangy.
💡 Helpful Tips
Use cold cream
Cold heavy cream whips much more easily and gives you a lighter filling.
Drain the pineapple well
This is one of the most important tips. Too much pineapple juice can make the dessert loose.
Cool the fruit completely
Never mix hot fruit into the cream layer. Let it cool to room temperature first.
Don’t over-whip
Whip the cream until it holds its shape, but stop before it becomes grainy.
Make it ahead
This dessert is excellent for preparing the day before serving.
Use individual glasses
For parties, individual dessert cups make serving easy and create a beautiful presentation.
🍓 Variations
🍫 Strawberry Chocolate Version
Add a thin layer of chocolate cookie crumbs and finish with chocolate shavings.
🥥 Tropical Version
Add shredded coconut to the pineapple layer and sprinkle toasted coconut over the top.
🍌 Banana Version
Add thin banana slices between the cream and strawberry layers.
🫐 Berry Version
Replace part of the strawberries with blueberries or raspberries.
🍋 Lemon Version
Add a little extra lemon zest to the cream for a brighter citrus flavor.
👨👩👧👦 Perfect for Dessert Lovers
This recipe is especially enjoyable for people who love:
🍓 Fresh strawberries
🍍 Tropical pineapple
🥛 Creamy desserts
🍪 Cheesecake-style desserts
❄️ Chilled treats
🍰 No-bake recipes
✨ Beautiful layered desserts
It is also a wonderful recipe to make with children because they can help crush the biscuits, arrange the fruit, and build the layers.
🍽️ Serving Suggestions
Serve the dessert well chilled.
For an elegant presentation, place each portion in a clear glass so the colorful layers are visible.
You can serve it after:
- A family dinner
- A barbecue
- A summer lunch
- A birthday meal
- A holiday gathering
- Afternoon tea
- A special celebration
Pair it with coffee, tea, or a refreshing fruit drink.
⏱️ Recipe at a Glance
Preparation: 25 minutes
Cooking: 5–10 minutes
Chilling: 4 hours or overnight
Difficulty: Easy
Type: No-bake dessert
Servings: 8–10
❤️ Conclusion
This Strawberry & Pineapple Layered Dessert proves that an impressive dessert doesn’t have to be difficult.
With buttery biscuits, silky cream, juicy strawberries, and sweet tropical pineapple, every layer brings something special. The dessert is colorful, refreshing, creamy, and wonderfully satisfying.
Best of all, you can prepare it ahead of time and simply take it from the refrigerator when your guests arrive.
So grab your strawberries, open that can of pineapple, whip up some cream, and start layering!
🍓 Strawberry lovers will adore it.
🍍 Pineapple lovers will come back for seconds.
🥛 Creamy-dessert lovers will want the recipe.
❤️ And everyone at the table will want another spoonful!
🌟 Final Tip
For the prettiest result, don’t rush the layers. Keep each fruit mixture cool, make the cream smooth and fluffy, and chill the finished dessert thoroughly.
One dessert, beautiful layers, no oven, and plenty of fruity goodness! 🍓🍍✨