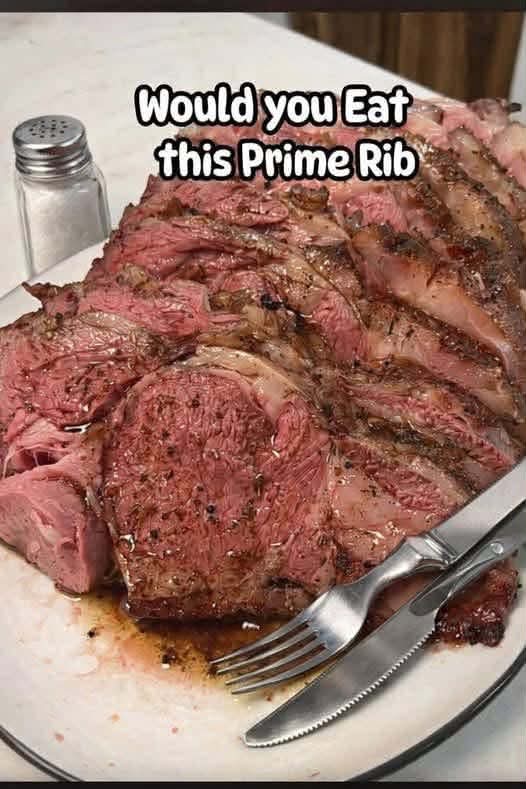
The Ultimate Perfect Prime Rib Recipe
(The “Foolproof” Method)
Why this recipe works: Prime rib is expensive, so you don’t want to mess it up. The key to the juicy, rosy interior and the crispy crust you see in the photo is a combination of reverse searing (cooking low and slow first, then blasting it with high heat at the end) and dry brining (salting it a day ahead).
The Science of the Photo
In your image, notice the marbling (the white fat running through the red muscle) and the juices on the plate. This cut is from the rib section (bones 6 through 12). Because it has a “fat cap” on top, as it cooks, that fat melts and bastes the meat from the inside out, keeping it incredibly tender. The roast in the photo has been sliced thickly against the grain, which ensures a tender bite every time.
The Recipe
Prep time: 10 minutes (+ 24 hours dry brining)
Cook time: 2 – 3 hours (depending on size)
Total time: ~ 3 hours + overnight rest
Servings: 6-8 people (depending on bone count)
Ingredients
· 1 Prime Rib Roast: Look for a 3-4 bone standing rib roast (weight between 6 to 10 pounds is ideal). Bone-in is best for flavor, but boneless works too.
· Kosher Salt: 1 tablespoon per 5 pounds of meat (do not use table salt).
· Freshly Ground Black Pepper: 2 tablespoons.
· Garlic Powder: 1 tablespoon.
· Optional: Fresh thyme or rosemary sprigs (for the roasting pan).
· Olive Oil or High-Smoke Point Oil: For the final sear.
Equipment Needed
· Meat Thermometer (Instant-read probe is ideal; leave-in probe is even better).
· Wire Rack (placed inside a baking sheet) for resting.
· Large Roasting Pan with a rack.
Step-by-Step Instructions
Phase 1: The Dry Brine (Do this 24 hours before cooking)
- Prepare the meat: Remove the roast from the refrigerator. If it has a large, thick fat cap, you can score it with a sharp knife in a crosshatch pattern to help it render (melt) better.
- Season heavily: Combine your Kosher salt, pepper, and garlic powder. Rub this mixture all over the roast. Don’t be shy—it needs a lot of salt to penetrate the thick meat.
- Rest uncovered: Place the roast on a wire rack over a baking sheet. Put it back in the fridge uncovered for 24 hours. This dries the surface of the meat, which is the secret to that dark, crusty outer layer seen in your photo.
Phase 2: The Slow Roast (Reverse Searing Method)
- Bring to room temp: Take the roast out of the fridge 2 hours before cooking and let it sit on the counter.
- Preheat oven: Set your oven to 225°F (110°C).
- Place the meat: Put the roast fat-side up on a rack inside your roasting pan. Insert your leave-in thermometer into the center of the largest muscle, avoiding the bone.
- Cook low and slow: Roast for roughly 15 to 20 minutes per pound. For a 6-pound roast, this takes about 1.5 to 2 hours.
- Target temperature: Cook until the internal temperature reaches 120°F – 125°F (49°C – 52°C) for a perfect Medium-Rare (like in the photo). Note: Pull it at 115°F if you want Rare, or 130°F for Medium.
Phase 3: The High-Heat Sear (The Crust)
- Rest: Remove the roast from the oven. Tent it loosely with foil and let it rest for 15 to 20 minutes. This resting period is non-negotiable; it allows the juices to redistribute so they don’t spill out when you slice it.
- Blast the heat: Crank your oven up to 500°F (260°C).
- Sear: Once the oven is screaming hot, put the roast back in (uncovered) for 5 to 10 minutes. Watch it closely! You are looking for a deep, dark brown crust exactly like the one on the left side of your photo.
- Remove and Final Rest: Take the roast out immediately. Let it sit for another 5-10 minutes before carving.
Phase 4: Carving & Serving
- Remove the bones: Stand the roast up on its ribs. Using a sharp carving knife, slice right along the bone line to remove the entire rib rack. (If you want, you can tie these bones with twine and roast them along with the meat for extra flavor).
- Slice: Place the boneless roast flat on the cutting board. Cut thick slices (about 3/4 to 1 inch thick, as seen in your photo) against the grain.
- Serve: Pour the pan juices over the slices. Serve with horseradish cream or jus on the side.
Expert Tips for the Photo-Ready Look
· Don’t over-trim the fat: The fat caps in your photo are essential. They provide that rich, beefy flavor that Prime Rib is famous for.
· Don’t skip the thermometer: Guessing is how you end up with a grey piece of meat. You must use a digital thermometer.
· Serve immediately: The beauty of Prime Rib (as shown in your pic) is the warmth of the meat while the fat is still slightly glistening. Slice right before serving.
So, yes—I would absolutely eat this Prime Rib! It looks tender, properly cooked, and full of flavor. Enjoy your meal!