Introduction
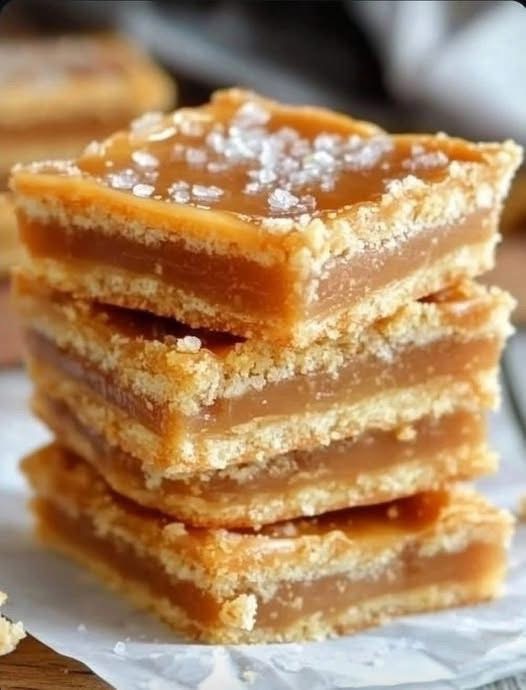
Prepare your taste buds for an unforgettable journey into the realm of sweet and salty perfection with these Irresistible Salted Caramel Butter Bars! Imagine sinking your teeth into a delectable treat where a golden, tender shortbread crust provides the perfect foundation for a luscious, gooey caramel filling, all crowned with a delicate sprinkle of flaky sea salt. This isn’t just a dessert; it’s an experience – a symphony of textures and flavors that will have everyone reaching for a second, or even a third, piece.
What makes these butter bars so utterly captivating? It’s the magical interplay between the rich, buttery base, the deep, caramelized sweetness, and that crucial pinch of salt that elevates every bite. The buttery shortbread melts in your mouth, offering a delightful counterpoint to the chewy, luxurious caramel that follows. That final flourish of sea salt isn’t just for show; it cuts through the sweetness, brightens the flavors, and leaves a lingering, satisfying warmth on your palate. This recipe is designed to be approachable yet impressive, making it ideal for seasoned bakers and enthusiastic beginners alike. You’ll be amazed at how easily you can create such a show-stopping dessert that tastes like it came straight from a gourmet bakery.
These Salted Caramel Butter Bars are more than just a delicious treat; they are a versatile crowd-pleaser perfect for any occasion. Whether you’re bringing them to a potluck, gifting them to friends and family, serving them at a holiday gathering, or simply indulging in a quiet moment of culinary bliss, they are guaranteed to disappear quickly. Their rich, satisfying nature makes them an excellent accompaniment to a cup of coffee or tea, a delightful after-dinner dessert, or simply a well-deserved afternoon pick-me-up. Get ready to bake up a batch of pure happiness, because once you try these, you’ll understand why they’re truly irresistible!
Nutritional Information
Per serving (approximate values):
- Calories: 350-400
- Protein: 3-5g
- Carbohydrates: 45-55g
- Fat: 18-25g
- Fiber: 1-2g
- Sodium: 200-280mg
Ingredients
For the Shortbread Crust and Crumb Topping:
- 2 ½ cups (300g) all-purpose flour
- ¾ cup (150g) granulated sugar
- ½ teaspoon salt
- 1 cup (226g) unsalted butter, very cold and cut into ½-inch cubes
- 1 teaspoon pure vanilla extract (optional, but highly recommended)
For the Salted Caramel Filling:
- 1 cup (226g) unsalted butter
- 1 cup (200g) packed light brown sugar
- ½ cup (120ml) heavy cream
- 1 (14-ounce) can (397g) sweetened condensed milk
- 1 teaspoon pure vanilla extract
- ½ teaspoon salt (fine sea salt or table salt)
- 1-2 teaspoons flaky sea salt, for sprinkling (like Maldon or fleur de sel)
Instructions
- Prepare for Baking: Preheat your oven to 350°F (175°C). Line a 9×13-inch baking pan with parchment paper, leaving an overhang on the sides to easily lift the bars out later. Lightly grease the parchment paper.
- Make the Shortbread Crust: In a large mixing bowl, whisk together the all-purpose flour, granulated sugar, and ½ teaspoon of salt. If using, add the vanilla extract now.
- Cut in the Butter: Add the very cold, cubed butter to the flour mixture. Using a pastry blender, your fingertips, or a food processor, cut the butter into the dry ingredients until the mixture resembles coarse crumbs with some pea-sized pieces of butter remaining. Be careful not to overwork the dough; the colder the butter, the flakier the crust.
- Form the Bottom Layer: Press about two-thirds of the crumb mixture evenly into the bottom of the prepared 9×13-inch baking pan. Reserve the remaining one-third of the crumb mixture for the topping.
- Blind Bake the Crust: Bake the pressed crust for 15-18 minutes, or until it’s lightly golden brown around the edges. Remove from the oven and set aside while you prepare the caramel. Keep the oven on.
- Prepare the Caramel Filling: In a medium-sized heavy-bottomed saucepan, combine the 1 cup of butter, brown sugar, heavy cream, and sweetened condensed milk. Place the saucepan over medium heat.
- Cook the Caramel: Bring the mixture to a gentle boil, stirring constantly with a whisk or rubber spatula to prevent scorching. Once boiling, reduce the heat to medium-low and continue to boil gently, stirring frequently, for 5-7 minutes, or until the caramel has thickened considerably and turned a rich amber color. It should coat the back of a spoon. Be patient and don’t rush this step; proper thickening is key to a stable caramel.
- Finish the Caramel: Remove the saucepan from the heat. Stir in the 1 teaspoon of vanilla extract and ½ teaspoon of salt. Be cautious, as the caramel will be very hot.
- Assemble the Bars: Pour the hot caramel evenly over the pre-baked shortbread crust in the pan.
- Add the Topping: Crumble the reserved one-third of the shortbread mixture evenly over the top of the caramel layer.
- Final Bake: Return the pan to the oven and bake for an additional 25-30 minutes, or until the crumb topping is golden brown and the caramel is bubbly around the edges and appears set (it will still be soft in the center).
- Cool Completely: This step is CRUCIAL for clean cuts! Remove the pan from the oven and place it on a wire rack to cool completely at room temperature. This will take at least 2-3 hours, or even longer. For best results, you can chill the bars in the refrigerator for at least 1 hour once they’ve cooled down to room temperature.
- Sprinkle and Cut: Once completely cooled and set, use the parchment paper overhang to lift the entire slab of bars out of the pan. Sprinkle generously with flaky sea salt over the top. Using a sharp knife, cut the slab into 16-24 squares or rectangles, depending on your desired size. For cleaner cuts, you can warm your knife under hot water and wipe it dry between slices.
- Serve and Enjoy: Serve at room temperature or slightly warmed. Store any leftover bars in an airtight container.
Cooking Tips and Variations
Achieving bakery-quality Salted Caramel Butter Bars is easier than you think with a few insider tips and tricks. The foundation of these bars lies in a perfectly tender, crumbly crust, which starts with using very cold butter. When you cut cold butter into the flour, it creates pockets of steam during baking, resulting in that desirable flaky texture. Avoid overmixing the crust dough; you want it to be crumbly, not a smooth paste. Overworking develops gluten, leading to a tough crust. If you don’t have a pastry blender, your fingertips work wonderfully, just work quickly to keep the butter cold. For an even more tender crumb, you can substitute a portion of the granulated sugar in the crust with powdered sugar, which has a finer texture and helps prevent gluten development.
The caramel filling is the star of the show and requires a bit of attention, but it’s absolutely worth it. Always cook your caramel over medium heat and stir constantly to prevent it from sticking and burning at the bottom of the pan. A heavy-bottomed saucepan distributes heat more evenly and reduces the risk of scorching. The caramel is ready when it thickens significantly and coats the back of a spoon, leaving a clear path when you run your finger across it. Don’t be tempted to undercook it, or your bars will be too runny. Conversely, don’t overcook it to the point of becoming hard candy; it should remain gooey and chewy. The addition of a small amount of salt directly into the caramel mixture, in addition to the flaky sea salt on top, enhances its richness and balances the sweetness beautifully. For the flaky sea salt, don’t skimp! It provides bursts of briny flavor and a delightful textural contrast that truly makes these bars shine. Maldon or fleur de sel are excellent choices for their large, delicate flakes.
When it comes to cutting the bars, patience is your best friend. Allowing the bars to cool completely, preferably chilling them for a while in the refrigerator, is paramount for clean, sharp edges. If you try to cut them while warm, the caramel will ooze, and the bars will fall apart. For the neatest slices, use a very sharp knife, and for extra precision, you can dip the knife in hot water and wipe it dry between each cut. This helps the warm blade glide through the sticky caramel without tearing. Store any leftover bars in an airtight container at room temperature to maintain their freshness and prevent them from drying out.
These Salted Caramel Butter Bars are fantastic as is, but they also serve as a wonderful canvas for creative variations. For the chocolate lovers, consider adding ½ cup of mini chocolate chips to the crust mixture, or sprinkle them over the caramel before adding the crumb topping. You could also drizzle melted dark or milk chocolate over the cooled bars for an extra layer of indulgence. To add a nutty crunch, finely chop ½ cup of pecans or walnuts and fold them into the crust mixture before pressing it into the pan. This provides a delightful textural contrast and a deeper flavor profile. For a touch of warmth and spice, incorporate ½ teaspoon of cinnamon or a pinch of nutmeg into the dry ingredients of the crust. If you’re feeling adventurous, a hint of espresso powder (½ teaspoon) can be added to the caramel to deepen its flavor and add a subtle coffee note that pairs beautifully with caramel. For those with dietary restrictions, these bars can often be adapted; gluten-free all-purpose flour blends usually work well for the crust, though the texture might be slightly different. With these tips and variations, you can customize your Salted Caramel Butter Bars to perfectly suit your taste and occasion, ensuring every batch is a resounding success.
Storage and Reheating
Proper storage is key to keeping your Irresistible Salted Caramel Butter Bars fresh, chewy, and delicious for as long as possible. Once the bars have completely cooled and been cut, arrange them in a single layer in an airtight container. If you need to stack them, place a piece of parchment paper or wax paper between the layers to prevent them from sticking together. Store the container at room temperature for up to 3-5 days. This allows the caramel to remain soft and gooey. Avoid direct sunlight or warm spots in your kitchen, as this can cause the caramel to soften too much.
For longer storage, these butter bars freeze beautifully. Once cooled and cut, place the bars in a single layer on a baking sheet and freeze for about an hour until firm. Then, transfer the frozen bars to a freezer-safe airtight container or heavy-duty freezer bag, again separating layers with parchment paper. They can be stored in the freezer for up to 2-3 months. To enjoy, simply remove the desired number of bars from the freezer and let them thaw at room temperature for 30-60 minutes, or until they reach your preferred texture. You can also pop them in the microwave for 10-15 seconds for a warm, extra-gooey treat.
Reheating these bars is generally not necessary if they’ve been stored at room temperature, as the caramel is designed to be soft and chewy. However, if you prefer a warm, melty caramel experience, you can gently reheat individual bars. Place a bar on a microwave-safe plate and microwave on high for 10-15 seconds. Be careful not to overheat, as the caramel can become extremely hot and burn. Alternatively, you can warm them in a preheated oven at 250°F (120°C) for about 5-7 minutes. This gentle warmth will soften the caramel and make the crust slightly crisp again, providing a delightful fresh-baked feel. Always allow them to cool for a minute or two before eating, as the caramel can retain heat.
Frequently Asked Questions
What makes the caramel in these bars so gooey and chewy?
The secret to the perfectly gooey and chewy caramel in these bars lies in the combination of sweetened condensed milk, brown sugar, and heavy cream, all cooked down to the right consistency. Sweetened condensed milk provides a stable base and a rich, creamy texture, while brown sugar adds depth of flavor and contributes to the chewiness due to its molasses content. Cooking the mixture until it thickens significantly ensures that the caramel sets to a firm yet yielding texture that holds its shape but remains wonderfully soft and pliable when you bite into it. Proper cooling is also crucial, as it allows the caramel to fully set and achieve its intended chewiness.
Can I make these bars ahead of time for an event?
Absolutely! These Salted Caramel Butter Bars are an excellent make-ahead dessert, which makes them perfect for parties, potlucks, or holiday gatherings. You can bake them up to 3-4 days in advance and store them in an airtight container at room temperature. The flavors often meld and deepen beautifully after a day or two, making them even more delicious. If you need to prepare them further in advance, they freeze exceptionally well for up to 2-3 months. Simply thaw them at room temperature before serving, and they’ll taste just as fresh as the day they were baked.
Why is my crust not crumbly, or why is my caramel too hard/runny?
Several factors can affect the texture of your crust and caramel. For the crust, if it’s not crumbly and is instead tough, it’s likely due to overmixing the dough or using butter that wasn’t cold enough. Overmixing develops gluten, leading to a harder crust. Always use very cold butter and mix just until coarse crumbs form. If your caramel is too hard, it was likely overcooked. Caramel needs to be cooked to a specific temperature or consistency; if it goes too far, it becomes brittle. If it’s too runny, it was undercooked and didn’t reach the proper thickening stage. Ensure you cook the caramel on medium heat, stirring constantly, until it visibly thickens and coats the back of a spoon. A candy thermometer can help, aiming for around 235-240°F (113-116°C) for a soft-ball stage, though visual cues are often sufficient for this recipe.